Have you heard of winter sowing? It is simply the process of starting seeds outside, using modified milk jugs or similar containers.
‘That’s it?’, you ask, ‘isn’t there more to it than that?’
Not really. That’s the gist of it.
Winter sowing is an easy, efficient way to start seeds for a garden of any size. It’s a great way to easily plant many seeds for a large, sprawling garden, or for a small container garden on a patio.
And, if you are sowing seeds that need a period of cold stratification, this is a great method to use.
Seeds that naturally grow in winter climates need a period of time- usually between 30 and 120 days- of cold to germinate.
Indoor cold stratification is possible by putting seeds in the refrigerator, but it’s a practice that comes with risks and hassle- moldy seeds and forgetful sowers, not to mention that most of us have fridges full to the brim where baggies of seeds are easily lost. It’s much easier to let winter do its thing in the conditions that nature provides.
So, what’s so special about this method of starting seeds? And why should I bother?
Read on for 5 reasons you’ll love winter sowing and a quick tutorial on how to get started. Ready?
Winter Sowing Uses Materials You Probably Already Have at Home
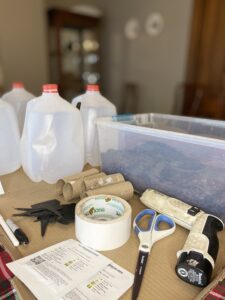
The materials you need for winter sowing are these: milk jugs or another clear plastic container; a tool to make holes in the jugs; seeds; a permanent marker and plant tags; potting soil; scissors; and tape.
That’s it, that’s all you need. There’s no other special equipment or tools, no strenuous exertion required, or complex instructions to master. All it takes is collecting milk jugs for a few months and putting them to use.
Compare that to starting seeds in seed trays indoors, where there is more equipment to buy, such as heat mats, racks, seed trays, and grow lights, and more watchful effort required. Winter sowing is a breeze by comparison!
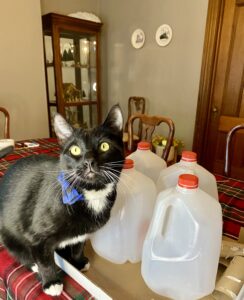
Winter Sowing is Cost Effective
We gardeners know how easy it is to spend money on the garden. Wouldn’t it be nice to get more bang for your buck? Sure, you could just sow seeds in your garden beds and be done with it, but planting seeds in a protective container means that they aren’t susceptible to all the factors that can happen in nature. Each of your seeds has more of a chance to grow and to grow well in a controlled environment.
Winter sowing creates an Inexpensive Little Greenhouse for your seedlings
Speaking of protection, you are making a little greenhouse without using any expensive materials, like polycarbonate, fiberglass, window frames, hay, wood, hoops, or glass. Each little jug functions to keep the plants protected from harsh temperatures yet lets in sunlight and the appropriate humidity that makes seedlings flourish.
While the seeds won’t start growing as early as those started indoors on heat mats and with grow lights, the jugs give them a considerable advantage over direct sowing in a garden bed. If you’re in areas like I am here in upstate NY where we have a very short growing season, any extra help goes a long way.
seeds sown in jugs are Protected from Animals (and forgetful gardeners!)
If you’re like me, you know the struggle of protecting your plants from all kinds of critters in your garden areas: deer, squirrels, chipmunks, and everything else. Not to mention the birds that like to eat seeds as soon as you plant them.
It’s a constant struggle to maintain that balance between planting for nature, and protecting your plants from it. I love to see the deer use our yard, though I would like them to leave some plants for others to enjoy!
Winter sowing protects your young seeds from getting eaten or trampled by deer, and other birds and animals.
And it also protects my seeds from me. How many times have I direct sown something in a bed, just to forget and dig up the space the following spring? So many times!
Starting seeds in jugs lets me know exactly what I’ve planted, and where.
Winter Sowing Provides an Opportunity to Garden in Winter
I don’t know about you, but at the end of the fall season, I’m ready to hang up my trowel. After my beds are covered with leaves and compost, and all tucked in for winter, I breathe a sigh of relief. And then I take a breather.
But around December- February, I start to miss it again.
Enter winter sowing!
That’s the perfect time to get out the potting soil and the jugs and get to work. It’s a great chance to feel some soil on my fingers and start dreaming of next season’s garden.
Are you convinced? Ready to try it out?
Here’s a simple tutorial to get you started.
Supplies you’ll need:
-
- milk jugs or another clear plastic container
-
- tool to make holes in the jugs- I use a drill bit on my electric screwdriver, but you can use another method
-
- marker or plant tags
-
- potting soil
-
- seeds
-
- scissors
-
- tape- duct tape, packing tape, or similar
Step 1- Gather your materials for winter sowing
Start collecting milk jugs a few months in advance, or ask friends and neighbors to save them for you. As you put them aside for winter sowing, rinse them out well. If you don’t, the sour milk smell will make your project very unpleasant (ask me how I know!).
Once you’re ready to start planting, put some newspaper down where you’ll be working, especially if you can get a little messy (like me). This year my kids had just eaten a pizza right before I started, so I snagged the empty pizza box which worked perfectly. Great score! I threw it on the compost pile after I was done.
Make sure you have a big enough space to spread out your materials to work comfortably.
Step 2- Cut holes in milk jugs
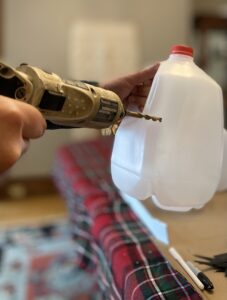
Use your drill bit to make holes in the bottom of the jug for drainage. At least four will suffice, but I put a few more- eight in the bottom of each one. Also, drill a hole in the middle of one of the sides of the jug, at the height of the lowest part of the handle. This will allow you to get your scissors into the plastic to cut around the jug.
Step 3- Cut Around the milk jug
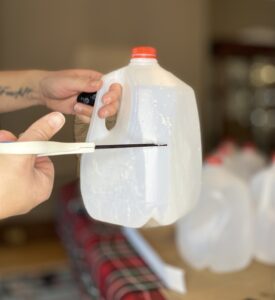
Your milk jug handle is going to serve as a hinge, allowing the top of the jug to bend backward, creating a planter on the bottom. Keeping this in mind, cut around the whole bottom of the jug, leaving about 1/3 of it to plant in. I usually just eyeball somewhere around the bottom of the milk jug handle and use that as a good height to cut around either side of the hole that I originally drilled.
Step 4- Fill with potting soil and plant your seeds
Using a scoop in your potting soil, fill up your container. You want to fill it enough so the roots of the seedlings have enough room to grow. A few inches are fine, usually about 3-4.
Follow the planting depth found on your seed packet, add your seeds to the appropriate depth of soil, and cover. It’s best to sow one container at a time, planting the whole thing before moving on. Don’t worry about spacing- usually, you will sow them closer than recommended and can thin them out later. Or, you may find that you can separate them instead of thinning them, depending on the seedling.
A note here about soil. Potting soil is best, and good-quality potting mix is the dream. But, like I said before- gardening can get expensive. Most seeds will grow just fine in soil from your backyard, or a mix made with homemade compost. If you want to save money, gather some soil or compost to use before the snow flies and the ground freezes, and tuck it away inside until you’re ready to plant. The seeds may not grow quite as well or as quickly, depending on what you’re planting, but it’s an option and one I’ve used many times in the past. The whole point of winter sowing is to make things easier, not harder, so don’t stress about it!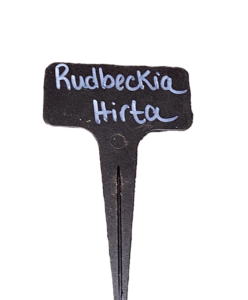
Step 5- Label your jugs
This is an important step. You may think that you’ll remember what you’ve planted in which jug, but chances are, you won’t. Jugs get moved, and marker fades away, so labeling becomes that much more important.
I use plastic plant tags that I stick in the dirt on the inside of the jugs. That way I can add the tags to my garden beds when I plant them in the early summer. Old plant tags can be reused, or any scrap piece of plastic can be swiped out of the recycling bin and written on in permanent marker. It doesn’t matter what you use, just that it will hold up to the elements, and that you can read it.
Step 6- Water
I like to water at this stage in the process. I gently water the soil in the jugs with a sprayer from the sink faucet or with a spray bottle. You can do this at another point in the process- some like to wet the potting soil before putting it in the jug, or some don’t water at all and let the snow and rain outside do the job for them. I like the feel of working with dry, fluffy soil and lovely seeds, so I wait until just before I’m ready to close them up. Again, figuring out what you like to do, and what works best for your region is key. If you do water at this point, keep the outside of the jug as dry as possible.
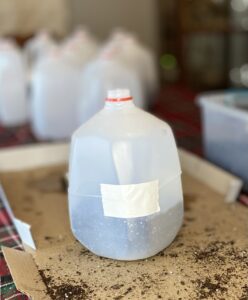
Step 7- Tape it shut
This is my least favorite part of the process. I may be one of the few people in the world who’s not a big fan of working with duct tape. Sure, it’s amazing and can fix almost anything, but it’s also loud and sometimes annoyingly sticky. So instead, I use a combination of packing tape and duct tape.
After you’ve made sure your jug is nice and dry, I rip a short piece of duct tape and place it almost directly across from the handle of the jug to keep it closed. Then I use two longer pieces of packing tape and finish closing the top and bottom together. You want to make sure the jug is sealed enough to withstand the winter weather, but not well enough that you can’t get into it next spring.
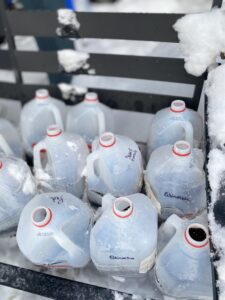
Step 8- Label, and place outside
Label the outside of the jug with a permanent marker, on the off chance it will be readable in spring. If the marker wears off, you will always have the inside plant tag for identification.
Then you want to remove the cap from the jugs and place them outside where they will be exposed to the weather, but protected from tipping over. You want rain and snow to get in the jugs, but you want them out of the way. If you are in an area that doesn’t get a lot of precipitation in the winter, you’ll want to water them occasionally, spraying through the hole in the top.
I put mine in full sun, but, like I said, here in upstate NY, we don’t have to worry too much about too much sunshine. If you live in an area with a sunny spring, an area with afternoon shade may be best. Wherever they end up, you’ll want to keep an eye on them as the temperatures heat up in the spring and early summer. They can quickly bake if you have an unusually hot day.
When temperatures rise, all you need to do is open up the jugs by cutting the tape during the day and cover them again at night. As they develop, they may need to be transplanted into a bigger container before being added to your garden beds, or they may be robust enough to transplant just fine.
And there you have winter sowing in a nutshell. What did you think?
If you have any questions, feel free to send me an email or leave a comment.
Let us know- what is your experience with winter sowing? Is it something you’ve done before, or plan to try for the first time?
Happy sowing!

One thought on “5 reasons you should try winter sowing today!”